The Financial Report Writer (FRW) provides great flexibility in creating financial reports within General Ledger.
This topic provides an overview of the basic actions you can perform in the Financial Report Writer and also the two important screens you will be working with when using this tool:
You can access the Financial Report Writer two different ways: the REPORTS button on the General Ledger Main Menu screen, or the SETUP button on the same screen. Depending on your security rights, you could be able to access the FRW one or both ways.
When accessing FRW, you might encounter and work extensively with two different screens in the General Ledger program:
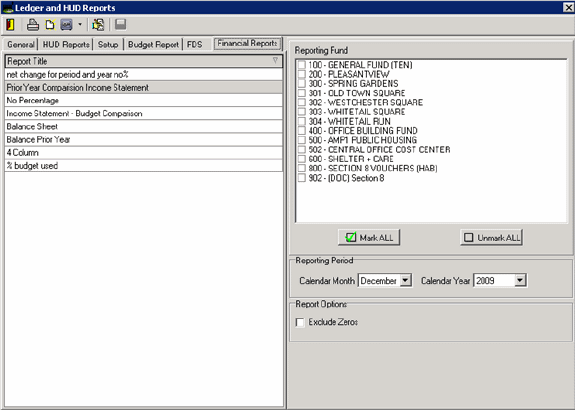
| 1. | Click on the Main Menu screen. The Ledger and HUD Reports screen opens. |
| 2. | Select the Financial Reports tab. |
| 3. | Click |
OR
| 1. | Click SETUP on the Main Menu screen. The Maintain Ledger Settings screen displays. |
| 2. | Click FINANCIAL REPORTS. The Maintain Financial Report screen appears where you can begin setting up a custom financial report. |
Note: You cannot print financial reports from the Setup area entry point.
On the Financial Report tab, you have the ability to work with existing reports to determine what financial records to include in your reporting:

In the Report Title section, your available reports are listed.
| ü | To preview a report, select it from the list and click |
| ü | To print a report, select it from the list and click |
In the Reporting Fund section, your available accounts are listed.
| ü | To enable an account to be used in your financial reporting, select its checkbox. When you click |
| ü | Use  or or  to select all, or none, of the funds quickly and easily. to select all, or none, of the funds quickly and easily. |
| ü | Using the calendar month and calendar year drop-down menus, specify the reporting period you want to include in your report. |
| ü | To exclude zeros from your report, select the exclude zeros report option checkbox. When selected, if the account balance, budget amount, or prior year amount, depending on the column format defined, is zero, it is "ignored" and will not print, thereby reducing the size of a generated report. |
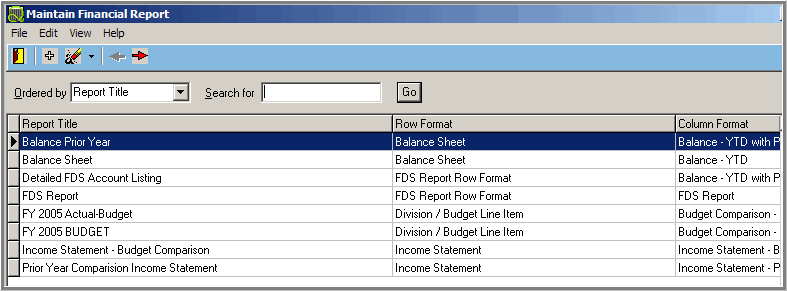
The Maintain Financial Report screen in the General Ledger program is, in essence, the hub for all your financial report activity:

| ü | Use the red arrow buttons  to select the next report in the list. The right arrow selects the next report below; the left arrow selects the next report above. to select the next report in the list. The right arrow selects the next report below; the left arrow selects the next report above. |
From this screen, you can:
| 1. | View/organize your current reports. |
| 2. | Search for specific report titles, row formats, or column formats. |
| 3. | Set up, or edit, a customized financial report. |
| 4. | Access the row format tool to fine-tune your reports even more. |
Once on the Maintain Financial Reports screen, you will see a list of all your agency’s financial reports in a table. Along with the report’s title, you may view each report’s row format and column format.
Note: For more information on row formats and column formats, See "Working With Formats and Line Types".
You have the choice to organize the report list by any of the table’s three column components: Report Title (default), Row Format, or Column Format.
| ü | To put the table in alphabetical order by a specific report component, select the component from the ordered by drop-down menu. The table will then sort the list of reports accordingly, in alphabetical order. |
You also have the ability to search for a specific report in the report table on the Maintain Financial Reports screen. When the list is long and time is short: search!
| 1. | Select the component you want to search for from the ordered by drop-down menu. |
| 2. | Enter a keyword pertaining to the component in the search by field and click GO. The first report in the table that matches your search entry will be highlighted. |
Hint: The search function is similar to a wildcard search. You may either enter an entire keyword, or just the few beginning letters of the word.
Copyright © Tenmast Software 2011