With the Financial Report Writer (FRW), you are able to customize and print financial reports. In order to do so, the FRW allows you to retrieve information from the General Ledger program and generates it into a report.
Note: Specifically, the reports are generated from the data collected on the Maintain Accounts screen.
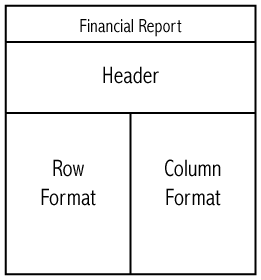
A financial report created with the FRW consists of a series of rows and columns with a heading. A selection of column formats are provided for you by WinTen² and cannot be altered. However, a row formatting tool is in place to allow you to create as complex a report as you need.
When designing a custom financial report, you may choose to build your report one of two ways:
| ü | Using existing row format data. This is helpful if the report you are creating is similar to another existing report with only a few minor changes. |
| ü | Building a financial report “from scratch” without pre-existing row data. |
Caution! If you choose to create a report using an existing row format, any future changes you make to that report/row format will affect EVERY report that uses that format!
A financial report consists of three sections: header, row, and column. These are the sections you customize to suit your needs.
The header is located at the top of the report and usually contains the company name, date, and name of report.
Columns are the vertical positions of data in a report. Column formats are provided by WinTen² but you can choose from a number of different formats to use in your reporting.
Rows are the horizontal positions of data in a report, and you can define the number of rows, as well as their content. Row formats are more complex than column formats and are completely customizable.
Select a report with the row format that best reflects the data you want to report.
| 1. | From the Maintain Financial Report screen, select a report with the row format you want to customize to your specific needs. |
| 2. | Click |
| 3. | Enter the report title in the space provided. If you are using an existing report's row format as a template, the template title will display by default. |
| 4. | Select a row format from the drop-down menu, if necessary. The selected row format will display in the table below. |
Note: Select "New" if you want to create a new row format; then, enter the new row description in the field that appears. After creating the report, you may then access the row format tool to set up the new row's details.
Hint: You can edit row formats separately using the Row Format tool. For more information, please see Row Formats on page 4.2.
| 5. | Click START to the second step/screen in the wizard. |
| 6. | Choose a column format from the column type drop-down menu. |
Note: For more information, please see Column Formats on page 4.1.
| 7. | Click NEXT to continue. |
| 8. | Enter the report header in the space provided. |
| 9. | Select the checkbox if you want to show negative numbers in parentheses. Example: -1900 displays as (1900). |
| 10. | Select the checkbox if you want to print account numbers. |
Note: Some reports are too large to display the account numbers and the account numbers will not display even when this checkbox is selected.
| 11. | Click NEXT to continue to the next step of the wizard. |
| 12. | Look over the report details and make sure they are correct. |
| 13. | Click FINISH to finalize the report. The report now displays and is accessible from the report table on the Maintain Financial Report screen and Financial Report tab. |
Copyright © Tenmast Software 2011