FDS is an acronym for Financial Data Schedule, HUD’s standardized financial information report. Your agency must submit the FDS to HUD at the end of the fiscal year.
Four FDS reports are available in the General Ledger program: Level 3 - AMP Financial Data - Balance Sheet, Level 3 - AMP Financial Data - Income Statement, Level 1 - PHA Financial Data - Balance Sheet, Level 1 PHA Financial Data - Income Statement. Before running the FDS reports, however, you must first set up specific information in order to return valid data.
Creating FDS reports involves 6 main steps:
| ü | Set up AMP information. |
| ü | Map AMP information to funds. |
| ü | Run Master Account Listing. |
| ü | Update accounts with new FDS account codes. |
| ü | Select FDS report source data. |
| ü | Customize FDS report. |
Note: In order to create FDS reports in General Ledger, you must first be given sufficient access rights to the program using Master Setup. Ask your administrator to enable you to run FDS reports and also give you access to the Setup area of the General Ledger program. (For more information, please see the Setting Up User Security Quick Start Guide.)
| 1. | From the Main Menu screen, click SETUP. The Maintain Ledger Settings Menu screen appears. |
| 2. | Click AMP LIST and on the Maintain AMP List screen that appears, click |
| 3. | Enter an AMP code (such as “001”) and a description for the AMP (such as “AMP 1”). (such as “AMP 1”). |
| 4. | Click |
| 5. | Repeat until all AMPs have been entered. |
| 6. | Return to the Maintain Ledger Settings Menu screen and click FUNDS. The Browse Funds screen opens with all active funds displayed in a table. |
| 7. | Select how you want to order the funds table from the ordered by drop-down list, enter the search criteria in the search for field and click GO. The first fund to match the criteria will be highlighted in the table. |
| 8. | Click |
| 9. | Click (AMP, Central Office Cost Center, or Housing Choice Voucher), FDS column sub-type (Capital Fund or Operating Fund), and a FDS AMP code you previously set up. The column type and subtype are predetermined by HUD’s FDS report format and the column type matches the HUD column headers for the report. |
| 10. | Click |
| 11. | Repeat steps 7-10 until all appropriate active funds have been mapped. (To quickly return to the Browse Funds screen for another search, click |
HUD recently changed, or made obsolete, certain FDS account codes. Any active accounts using these changed or eliminated FDS account codes will have to be assigned new FDS account codes. To find out which accounts need updated, you can run the Master Account Listing report. See "Master Account Listing"
| 12. | Return to the Main Menu screen and click REPORTS. The Ledger and HUD Reports screen appears with the General tab selected. |
| 13. | Select the Master Account Listing radio button. The right side of the screen becomes available to work with. |
| 14. | Select “All” in the selected fund and selected project drop-down lists and leave the account mask and range of account numbers blank. |
| 15. | Click |
| 16. | Review the FDS account column. All accounts with a blank FDS account column are accounts that need updated. Make a note of these accounts. |
| 17. | Return to the Main Menu screen and click ACCOUNTS. The Browse Accounts screen appears with all active accounts displayed in a table. |
| 18. | Using the Master Account Listing as a guide, search for and select an account to be updated and click |
| 19. | Click from the drop-down list. (This field will be blank, indicating the account needs updated). |
Note: The new FDS account codes can be found on the HUD Web site.
| 20. | Click |
| 21. | Repeat steps 18-20 until all appropriate active accounts have been updated. (To quickly return to the Browse Accounts screen for another search, click |
| 22. | Return to the Main Menu screen and click REPORTS. The Ledger and HUD Reports screen appears with the General tab selected. |
| 23. | Select the FDS tab and then select the radio button of the report you want to work with. |
| 24. | On the right side of the screen, specify the fiscal year and fiscal period on which you want to report. |
| 25. | Click |
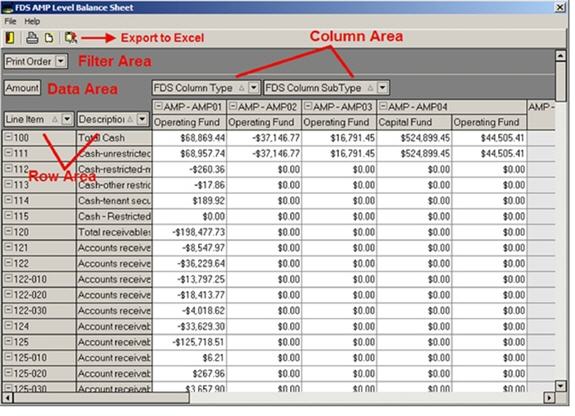
Once on the FDS report customizing screen, you can:
View a different filter field:
| ü | To view a different filtering of the report data, click the arrow next to a field in the filter area, and then check the checkbox of the data you want to view. Check “Show All” to view all filters. |
Add report data fields:
| ü | Right-click anywhere on a filter area, data area, column area, or row area field and select the Show Field List button that appears. You can open from this button a list of available report data fields. |
| ü | Select the field you want to add from the list and drag it to the area in which you want to place it. Or, highlight the field, select the appropriate data area from the drop-down list and click ADD TO. |
Reorganize data fields: You can quickly “pivot” the report by moving a field to another report area, or reordering the items within a report area.
| ü | To move a field to another area, click on the field and drag it to the appropriate area of the screen. |
| ü | To reorder fields within an area, click on the field and drag it to the new location; or, right-click on the field, select “Order” from the menu that appears, and choose where to move it. |
Show or hide data field in a row or column area:
| ü | Right-click anywhere on a column area or row area field and select “Hide” from the menu that appears. The field is removed/hidden and placed in the available report data fields list. |
Caution! There is no indication on the screen that one or more items are hidden and there is no way to undue or “unhide” the field. You must add the field manually from the available report data fields list.
| ü | To view different data in a row or column area, click the arrow next to a row/column header field, and then check the checkbox of the data you want to view. Check “Show All” to view all fields. |
Show or hide specific details for field:
| ü | Click on the “+” next to the field you want to expand; or, click the “-” to collapse the expanded details. Or, right-click on the expanded/collapsed field and select to either expand/collapse just the one field, or expand/collapse all fields at once. |
Note: You cannot directly edit the data on the FDS report customizing screen. Instead, you need to edit the source data and then regenerate.
| 26. | When you are finished customizing the report details, you can: |
| ü | Click |
| ü | Click |
| ü | Click |
| ü | Click |
Caution! Once you exit the screen, ALL report details will be lost!
Copyright © Tenmast Software 2011
 More on FDS account codes...