The viewing layout of a KPI can be customized to a user's unique specifications and each user in your organization can have a different layout for the same KPI. There are three ways you can customize your KPI views:
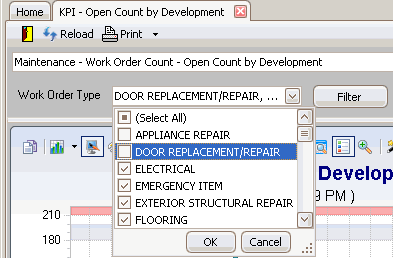
The filter feature allows you to filter KPI data to a specific detail. For example, filtering the Work Order Count KPI to display only the data for a specific work order type.
Note: Not every KPI has the option for filtering.
| 1. | In the Home tab menu, click KPI (under the HIP heading). The KPI - Pick a View tab opens. |
| 2. | Select the KPI you want to work with from the drop-down list at the top of the tab. Once selected, the KPI information appears on the tab. An additional filter drop-down list also appears with all available data filters. |
Hint: You can also quickly filter the KPI list by typing text into the drop-down list. As you type, the KPI that best matches your entry will display.
| 3. | If the KPI has filtering options, another drop-down list will appear containing all available filtering choices. By default, all items will be checked and included in the KPI data. Uncheck the checkbox(es) of any data you do NOT want to include in the KPI. |
| 4. | Click OK to apply your filter choices and then click  . The KPI automatically displays according to the set filters. . The KPI automatically displays according to the set filters. |
Hint: If you aren't happy with a filtered KPI, you can always quickly roll back all changes and restore a KPI's default layout using the  button!
The drill-down feature allows you to click on sections of a KPI view to focus, or pinpoint, on more specific information within the view.
Note: Not every KPI has the option for drill-downs.
| 1. | In the Home tab menu, click KPI (under the HIP heading). The KPI - Pick a View tab opens. |
| 2. | Select the KPI you want to work with from the drop-down list at the top of the tab. (You can also quickly filter the list of KPI's by typing text into the drop-down list. As you type, the KPI that best matches your entry will display.) Once selected, the KPI information appears on the tab. |
| 3. | Place your cursor over a section of the KPI in which you want to access more detailed information. If the cursor changes to a hand with a pointed finger, drill-down capability is available: |

| 4. | Click the area in which you want to drill-down. After selecting the drill-down section, the pinpointed information displays in various view types (bar graph, line graph, etc.) If a data table appears, you can then customize the table by filtering or sorting. |
Hint: You can exit the drill-downs and return to the original KPI view by clicking  .
.
Once you've selected the data table drill-down section, you can then customize the layout of the data table.
| 5. | You can filter the table to only display specific records by clicking the filter next to a column header. A list of all records in that column appears. Select and highlight the record and the data table automatically displays only that record's information. For example, if you select a specific account: |
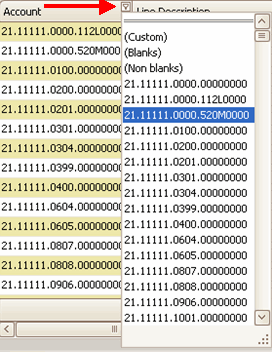
The table automatically sorts to only display that selected account information:

To remove a filter, click the appropriate red "X" button at the bottom of the table. If you want to edit a filter using the Filter Editor, select the Edit Filter button located to the right of the filter you want to edit. In the Filter Editor tool that appears, you can add, edit, or remove filters. (This tool can also be accessed by right-clicking on a column header and choosing Filter Editor from the menu that appears).

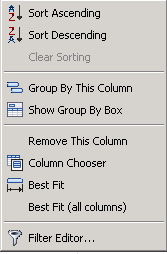
| 6. | You can also right-click anywhere in a specific column heading and select from even more filter options from the menu that appears: |
Note: If you like the customized table layout and would prefer to see the selected KPI drill-down table in that layout from now on, click  . The next time you access the KPI drill-down, the layout will default to the one you have just created and saved. OR, if you have made changes to the KPI drill-down table layout that you don't like and want to return to the original layout, click .
Hint: You can exit the drill-down table and return to the original KPI view by clicking .
| 7. | Once you have filtered and sorted the table to your needs, click |
Additional Drill-down Table Report Print Options
On the Print Preview screen, you can:
- Click
to save the drill-down table report to your files, and use the Zoom icons to zoom in or out to your preference. If the report has multiple pages, use the Navigation arrows to navigate through the pages.
- Click
to search for and find specific text within the report.
- Click
to save the report as a PDF.
- Click
to email the report as a PDF.
Hint: To exit out of an individual screen or tab, you can click ![]() on the toolbar, or
on the toolbar, or ![]() next to the screen/tab name. You can also use the Escape (ESC) key on your keyboard. (If you haven't saved any changes before exiting, a message will appear asking if you'd like to save before closing.)
next to the screen/tab name. You can also use the Escape (ESC) key on your keyboard. (If you haven't saved any changes before exiting, a message will appear asking if you'd like to save before closing.)

Note: Chart effects are not available for gauge KPI view types.
You can use the Chart Effects toolbar to change the visual presentation of your KPI graphical views. Many of these effects may not be necessary for your needs but experiment with the options to see the plethora of choices. After selecting an option, the effect on the graph is immediate.
Hint: If you aren't happy with your changes, you can always quickly roll back all changes and restore a KPI's default layout using the button!
Following is a brief description of the available effects:
 Copy: Copy the KPI view to your clipboard where you can then paste it into different programs (such as Microsoft Paint, Word, Excel, etc.)
 Gallery: Choose a different visual presentation of the KPI data. For example, changing the bars in a bar graph to lines or dots.
 Anti-Alias: Smooth the edges of the KPI graphical presentation (anti-aliasing is the default).
 Palette Selector: Change the color scheme of the KPI.
 3D/2D: Choose to visually present the KPI data in 3D or 2D (2D is the default).
 Axes Settings: Format the graphical presentation X axis and Y axis.
 Point Labels: Insert labels at all KPI data points.
 Data Grid: Show/Hide the KPI data displayed in a grid format (hiding the data grid is the default).
 Legend: Show/Hide the KPI legend (showing the legend is the default). User limits are also displayed in the KPI legend.

 Zoom: Zoom in to a particular section of a KPI for closer viewing.
 Properties: View and set all the above available chart effects for the KPI visual presentation in one place.
Copyright © Tenmast Software 2011