Open topic with navigation
Setting Up Late Fee Profiles
When setting up late fee profiles A set of rules that are applied to specific development(s), and late fee policies are those rules. Typically, each profile will contain 3 rules, or policies: a flat rate fee policy, a daily late fee policy, and a legal proceeding fee policy., you need to add the basic profile information, set up and map the profile to a deposit policy (or set of rules), specific account type(s), and transaction type(s). Typically, each profile will contain 3 rules, or policies: a flat rate fee policy, a daily late fee policy, and a legal proceeding fee policy.
Add Basic Profile Info
|
1.
|
Click SETUP on the Main Menu screen. On the Receivables Setup screen that appears, select the Profiles and Policies tab and then click LATE FEES. The Browse Late Fee Profiles screen opens with all available late fee profiles displayed in a table. |
|
2.
|
Click  on the toolbar. The Add Late Fee Profile Wizard is initiated. on the toolbar. The Add Late Fee Profile Wizard is initiated. |
|
3.
|
Enter a late fee profile descriptionand then check the checkboxes of the developments you want to include in the profile. For example, if your agency does not charge late fees for elderly housing developments, you would uncheck all those particular developments. |
Note: You are only able to have one profile per development. If another profile is added that includes a development for which there is already a profile, the first profile will have that development removed.
|
4.
|
Click NEXT, review the profile information, and then click FINISH to save and add the new profile. The Maintain Late Fee Profile Setup screen appears with the Main tab selected. |
Map Late Fee Policy
|
5.
|
Select the Late Fee Policies tab and click  on the toolbar. The Add Late Fee Policy Wizard is initiated. on the toolbar. The Add Late Fee Policy Wizard is initiated. |
|
6.
|
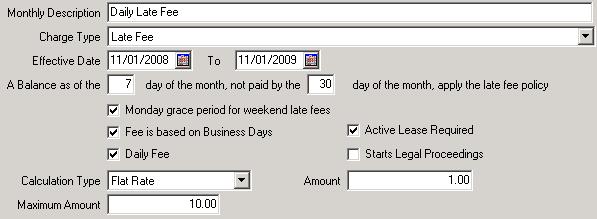
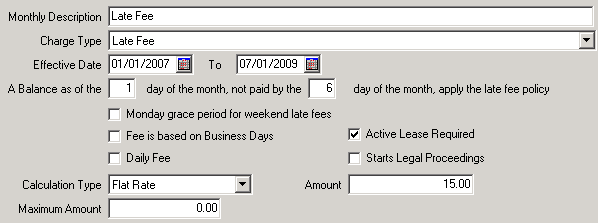
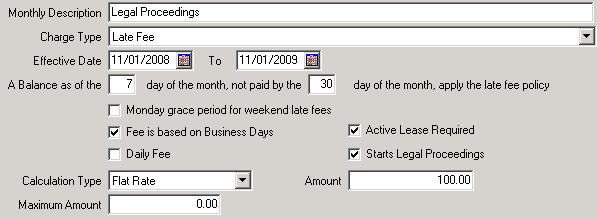
Enter the monthly description (when reviewing a customer’s account, this is what you will see), such as “late fee,” “daily fee,” or “legal proceeding fee.” |
|
7.
|
Select “late fee” as the charge type (transaction type to be generated). |
|
8.
|
Select an effective date, or the date range of when the policy is in effect, and enter when an outstanding balance should have a late fee applied. |
- Check the checkbox to allow a Monday grace period for weekend late fees. If checked, payments dropped off over the weekend and applied to the tenants' accounts on Monday will not be assessed late fees even though the payments are processed “late” on Monday. (This applies to HA's that do NOT use a business day only method of rent collection.)
- Check the checkbox if you want the late fee based on business days. If selected, you must specify holidays to ensure accurate late fee application. Click
 on the toolbar to define all holidays in the year that fall on a business day, such as President’s Day or New Years Day. (Tip: Holidays must be updated every year!)
- Check the daily fee checkbox if there will be a daily rate. Keep unchecked if it is a one time fee.
- If an active lease is required in order for the late fee to be applied, check the checkbox.
- Check the starts legal proceedings checkbox to create a legal proceedings record for the customer. This record then displays on the Maintain Legal Proceedings screen.
|
10.
|
Select a calculation type (flat rate, percentage, or special calculation), enter the late fee amount, and enter a maximum amount if necessary (late fee application stops when this amount is reached; mostly used with a daily fee). |
|
11.
|
Click START, review the policy’s information, and then click FINISH to add the new policy. The Late Fee Policies tab of the Maintain Late Fee Profile Setup screen appears again. |
Daily Late Fee

Flat Rate Fee

Legal Proceeding Fee

Map Account Type(s)
|
12.
|
Select the Account Types Included sub-tab at the bottom of the screen. |
|
13.
|
Click  to add an account to the new late fee policy. The Add Account to Late Fee Policy Wizard appears. The late fee profile and late fee policy you just added is displayed on the first screen of the wizard. to add an account to the new late fee policy. The Add Account to Late Fee Policy Wizard appears. The late fee profile and late fee policy you just added is displayed on the first screen of the wizard. |
|
14.
|
Select the account type to be affected by this policy from the drop-down list (this will usually be “tenant accounts receivable”). |
|
15.
|
Click NEXT, review the account type’s information, and then click FINISH to map the account type to the late fee profile. The Account Types Included sub-tab appears again with the newly mapped account type displayed in a table. |
Note: You cannot have multiple profiles per development, but you can have multiple policies for the same account type and time period per profile. This results in late fees only being applied once for each policy in monthly processing.
Hint: In order to delete a profile, all developments must be removed from the profile first. Also, all account types must be removed from a policy in order to delete a policy. Once a profile or policy has been used, they cannot be deleted. (Removing all developments and/or account types, however, will make them “inactive.”)
Map Transaction Type(s)
|
16.
|
Highlight the account type you want to work with and click the TRANSACTION TYPES button at the bottom of the screen. The Maintain Transaction Types for Late Fee Policies screen opens. |
|
17.
|
Click  on the toolbar and check the checkbox of the transaction types you want to map. on the toolbar and check the checkbox of the transaction types you want to map. |
|
18.
|
Click START and then click FINISH to apply your changes and map the transaction type(s) to the late fee profile. |
Now that you are finished setting up the needed information to make late fee application to account(s) possible, you can now generate the actual late fees for those account types. Generating late fees can be accomplished in the Periodic Processing area of the TAR program. See "Generating Late Fees"
Copyright © Tenmast Software 2011
 , you need to add the basic profile information, set up and map the profile to a deposit policy (or set of rules), specific account type(s), and transaction type(s). Typically, each profile will contain 3 rules, or policies: a flat rate fee policy, a daily late fee policy, and a legal proceeding fee policy.
 Late fee policy examples:

